How to Adjust the Volume and Mute Individual Applications


By using the volume button, you can adjust the volume and turn the speakers off, thus muting everything. By using software, the Volume Mixer that’s built into the Windows operating system, you can adjust the overall volume and you can also adjust the volume for individual applications as well as mute individual applications.
Say you don’t want your browser to play sound. You can mute the browser alone and let all the other applications play sound. Here’s how.
On Windows 7 and Windows 8
Left click the speaker icon from the system tray and this will show up.
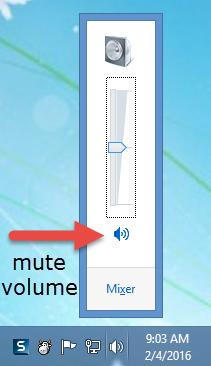
Use the slider to adjust the volume, click the speaker icon underneath it to mute the volume, click the Mixer button open the Volume Mixer which lets you change the volume and mute individual applications.
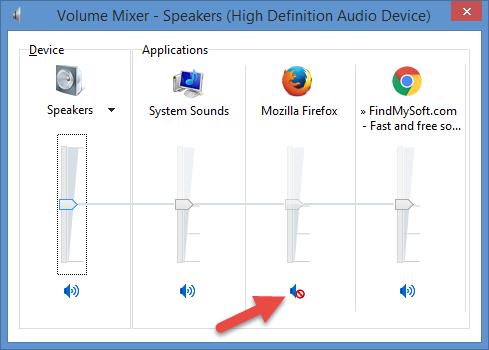
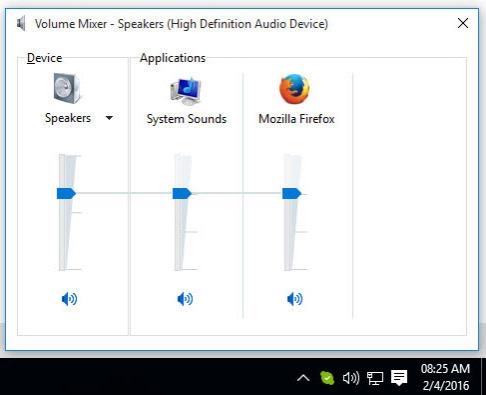
From the Volume Mixer window you can adjust the overall volume, adjust the volume for individual applications, and mute individual applications. Let’s say you want to mute Mozilla’s Firefox web browser. All you have to do is click the Firefox speaker icon, as seen below.
Alternatively, you can access the Volume Mixer by right clicking the speaker icon and selecting Open Volume Mixer from the context menu

There you have it, that’s how you adjust the overall volume, adjust the volume for individual applications, mute the overall volume, and mute individual applications on a PC powered by Windows 7 or Windows 8.
On Windows 10
With Windows 10, which is used on more than 200 million devices, Microsoft changed things a little bit. When you left click the speaker icon from the system tray, this shows up.
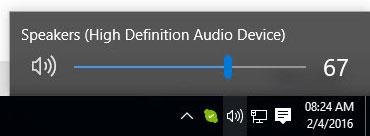
From left to right: speaker icon so you can mute the volume, slider so you can adjust the volume, number that indicates the volume level. What’s missing is the button that lets you open the Volume Mixer.
Microsoft made it a bit harder to access the Volume Mixer on Windows 10. Not too hard though. What you have to do is right click the system tray icon and select Open Volume Mixer.
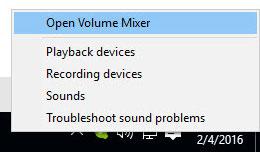
Once the Volume Mixer window shows up, you can adjust the overall volume, adjust the volume for individual applications, as well as mute individual applications.
Don’t like that the volume controls are horizontal on Windows 10?
Want to get them to be vertical, like they were on Windows 7 and 8? Here’s what you have to do.
Open the Registry Editor and find this Registry key:
HKEY_LOCAL_MACHINESoftwareMicrosoftWindows NTCurrentVersionMTCUVC
On the right hand side there should be a DWORD value named EnableMTCUVC. If its default value is 1, change it to 0.
If you can't find MTCUVC, it means it’s not there and you must create it. Right click on CurrentVersion and select the option to create a new key. Then right click on MTCUVC and select the option to create a new DWORD (32-bit) Value. Make sure its default value is 0 and you’re done.
The change will take effect immediately. Left click the speaker icon and you’ll see a vertical volume slider instead of the default horizontal slider.

Have software automatically adjust the volume
Instead of manually adjusting or muting the volume, you can use free software to automatically do it for you. I am, of course, talking about Softorino’s Volume Concierge, a free Windows application that works like this: set up volume rules (like turn the volume down to 20% at 1PM) and Volume Concierge will do as instructed.
Download Volume Concierge right here on FindMySoft.
Other useful software
Say you don’t want your browser to play sound. You can mute the browser alone and let all the other applications play sound. Here’s how.
On Windows 7 and Windows 8
Left click the speaker icon from the system tray and this will show up.
Use the slider to adjust the volume, click the speaker icon underneath it to mute the volume, click the Mixer button open the Volume Mixer which lets you change the volume and mute individual applications.
From the Volume Mixer window you can adjust the overall volume, adjust the volume for individual applications, and mute individual applications. Let’s say you want to mute Mozilla’s Firefox web browser. All you have to do is click the Firefox speaker icon, as seen below.
Alternatively, you can access the Volume Mixer by right clicking the speaker icon and selecting Open Volume Mixer from the context menu
There you have it, that’s how you adjust the overall volume, adjust the volume for individual applications, mute the overall volume, and mute individual applications on a PC powered by Windows 7 or Windows 8.
On Windows 10
With Windows 10, which is used on more than 200 million devices, Microsoft changed things a little bit. When you left click the speaker icon from the system tray, this shows up.
From left to right: speaker icon so you can mute the volume, slider so you can adjust the volume, number that indicates the volume level. What’s missing is the button that lets you open the Volume Mixer.
Microsoft made it a bit harder to access the Volume Mixer on Windows 10. Not too hard though. What you have to do is right click the system tray icon and select Open Volume Mixer.
Once the Volume Mixer window shows up, you can adjust the overall volume, adjust the volume for individual applications, as well as mute individual applications.
Don’t like that the volume controls are horizontal on Windows 10?
Want to get them to be vertical, like they were on Windows 7 and 8? Here’s what you have to do.
Open the Registry Editor and find this Registry key:
HKEY_LOCAL_MACHINESoftwareMicrosoftWindows NTCurrentVersionMTCUVC
On the right hand side there should be a DWORD value named EnableMTCUVC. If its default value is 1, change it to 0.
If you can't find MTCUVC, it means it’s not there and you must create it. Right click on CurrentVersion and select the option to create a new key. Then right click on MTCUVC and select the option to create a new DWORD (32-bit) Value. Make sure its default value is 0 and you’re done.
The change will take effect immediately. Left click the speaker icon and you’ll see a vertical volume slider instead of the default horizontal slider.
Have software automatically adjust the volume
Instead of manually adjusting or muting the volume, you can use free software to automatically do it for you. I am, of course, talking about Softorino’s Volume Concierge, a free Windows application that works like this: set up volume rules (like turn the volume down to 20% at 1PM) and Volume Concierge will do as instructed.
Download Volume Concierge right here on FindMySoft.
Other useful software
- Volumouse – a free tool that lets you control the sound volume with your mouse.
- Sound Lock – a free tool that prevents the volume from exceeding a certain threshold.
- Automuter – a free tool that can automatically mute the volume.
- Ear Trumpet for Windows 10 – a free tool that displays volume sliders for all applications that play sound.